When building AI-powered applications, managing API requests efficiently becomes critical. Caching, rate limiting, and centralized analytics are not luxuries, they are essentials for production systems. Cloudflare's AI Gateway provides these capabilities, and recently I integrated it with Z.AI's GLM-4.7 model to optimize my AI workflows. This guide walks through the complete setup process, from configuring a custom provider to making your first authenticated request.
As a Z.AI ambassador, I use their models daily for coding assistance and personal projects. Integrating with Cloudflare's gateway adds a layer of reliability and control that standalone API calls lack. If you work with AI APIs regularly, this setup is worth your time.
Setup time: Complete this entire integration in approximately 15 minutes. The configuration is straightforward, and you will be making cached, rate-limited API requests by the end of this guide.
Why Use Cloudflare AI Gateway with Z.AI?
Cloudflare AI Gateway acts as a proxy between your application and AI providers. When you route Z.AI requests through it, you gain:
- Response caching to reduce redundant API calls and save costs, with latency reductions of up to 90% through Cloudflare's global CDN
- Rate limiting to prevent quota exhaustion and manage usage with flexible sliding or fixed window techniques
- Authenticated access to secure your gateway with token-based authentication, preventing unauthorized consumption of your Z.AI quota
- Analytics and observability to track requests, tokens, costs, errors, and performance with detailed logs and custom metadata tagging
- Request retries and automatic fallback to improve resilience when Z.AI experiences temporary issues, reducing downtime impact
- Secure key storage in Cloudflare's encrypted infrastructure, eliminating the need to hardcode Z.AI API keys in your applications
- Custom provider support allowing any OpenAI-compatible API like Z.AI's coding endpoint to benefit from enterprise-grade features without vendor lock-in
- Centralized management with a unified dashboard for monitoring and controlling all your AI provider integrations in one place
For developers working with Z.AI's GLM-4.7 model, this integration is straightforward because the API follows OpenAI's structure. That compatibility makes migration seamless while unlocking powerful infrastructure capabilities that would be complex to build in-house.
Prerequisites
Before starting, ensure you have:
- A Z.AI account with API access (available in paid tiers)
- A Cloudflare account with access to AI Gateway
- Basic familiarity with REST APIs and cURL or similar HTTP clients
- Your Cloudflare account ID (found in your dashboard URL)
Step 1: Configure Custom Provider in Cloudflare
Cloudflare AI Gateway supports several built-in providers, but Z.AI requires custom configuration. Start by navigating to the AI Gateway section in your Cloudflare dashboard.
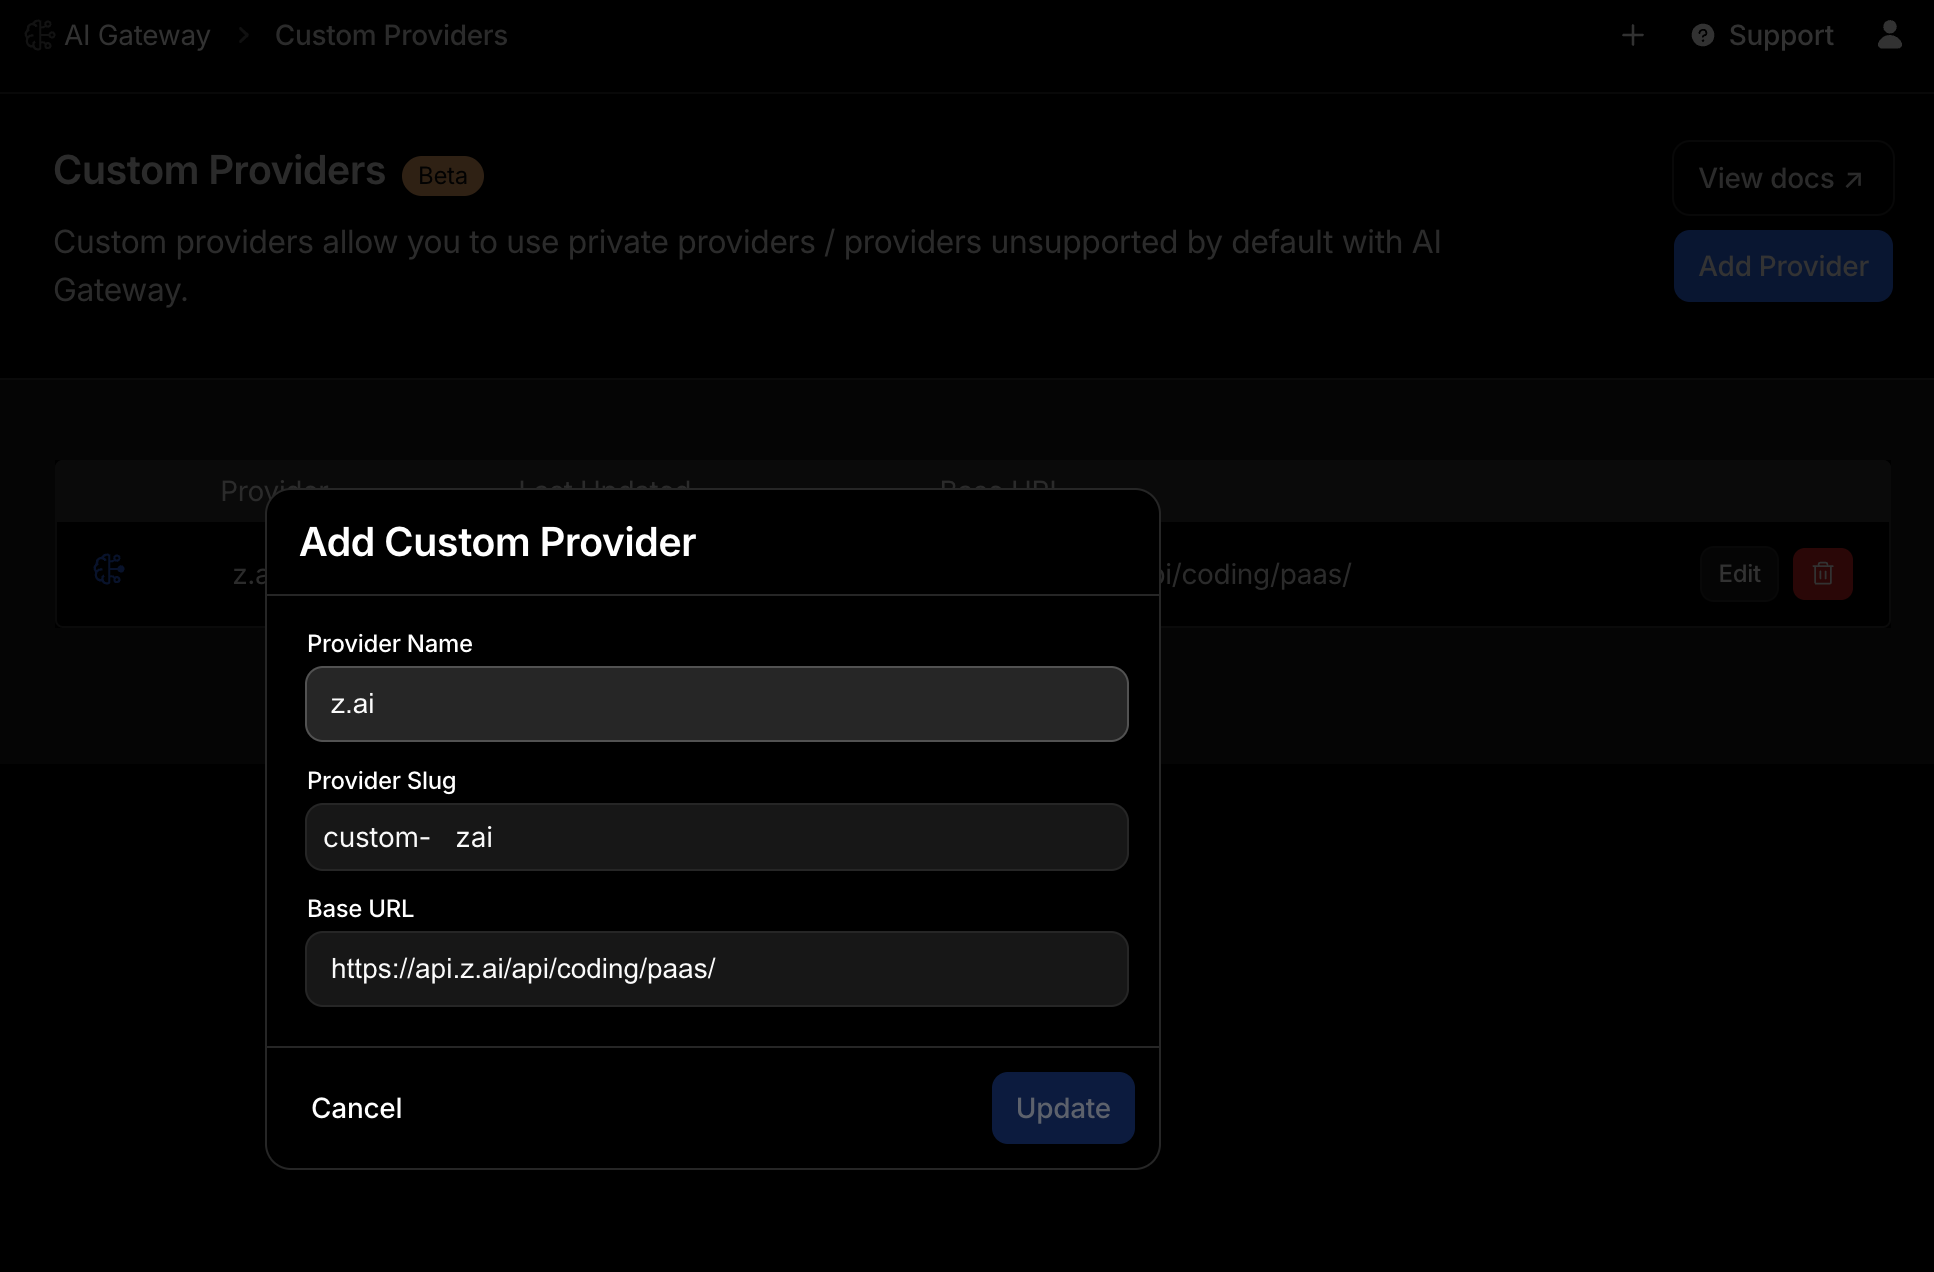
Click Configure Custom Providers, then Add Provider. You will see a form asking for three key details:
- Provider Name:
z.ai(this is the human-readable identifier) - Provider Slug:
zai(this becomescustom-zaiin API URLs) - Provider URL:
https://api.z.ai/api/coding/paas/(Z.AI's OpenAI-compatible endpoint)
The provider URL is critical. Z.AI's /api/coding/paas/ endpoint mirrors OpenAI's API structure, which allows Cloudflare to route requests without translation. After entering these details, save the configuration.
Step 2: Create and Configure Your Gateway
With the custom provider ready, create a dedicated gateway for Z.AI traffic. Click Add Gateway and name it something descriptive like zai-gateway.
This is where you enable the performance and security features:
Enable Response Caching
Turn on Cache Responses and set a cache duration. I chose 5 minutes, which works well for development and testing. For production workloads with stable prompts, you might extend this to reduce API costs significantly.
Configure Rate Limiting
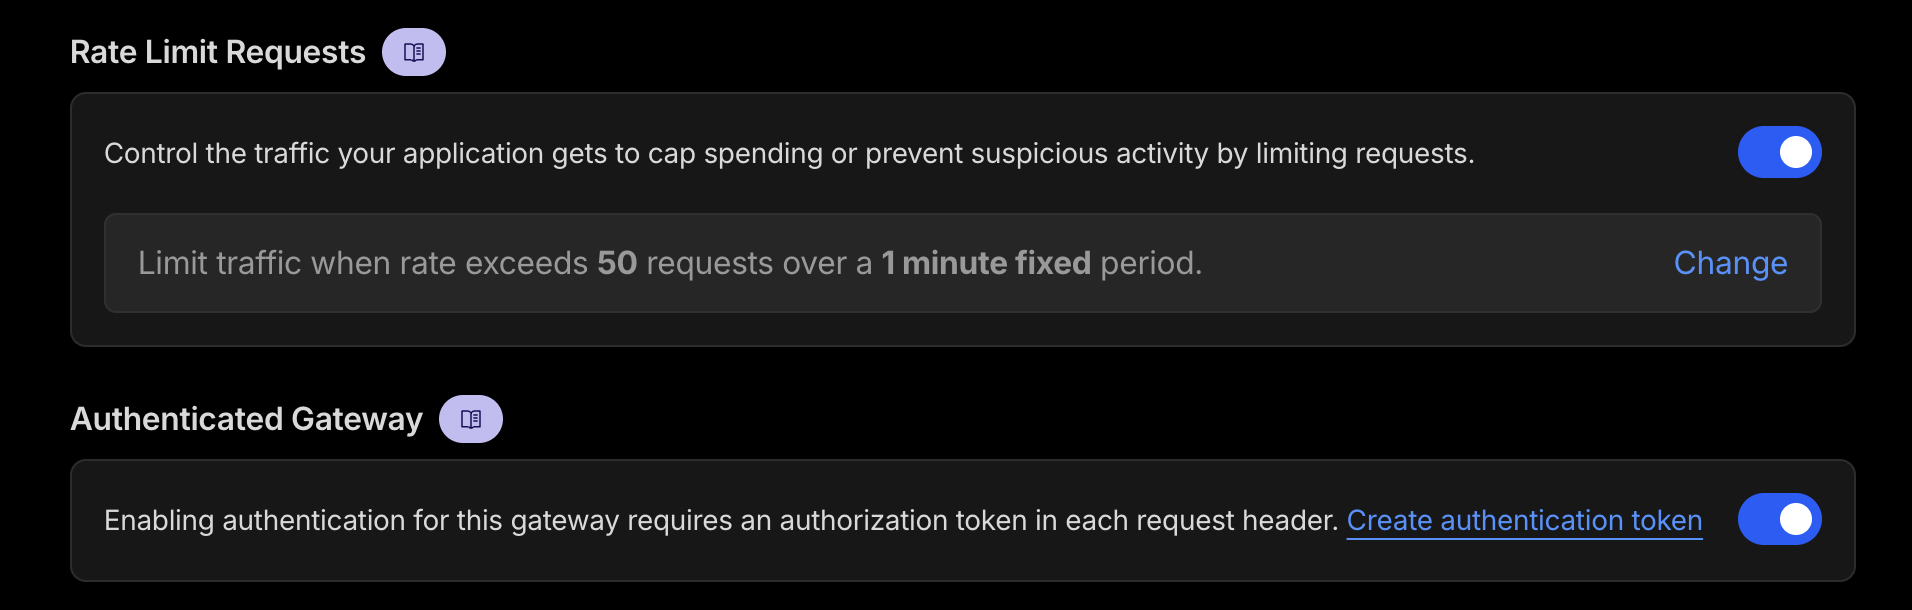
Enable Rate Limit Requests to prevent accidental quota exhaustion. This is especially useful when experimenting with new prompts or integrating the API into automated workflows.
Set Up Authenticated Access
Turn on Authenticated Gateway. This generates a token that you must include in request headers. It adds a security layer, ensuring only authorized clients can use your gateway. Without this, anyone with your gateway URL could consume your Z.AI quota.
After configuring these settings, save the gateway. Cloudflare will provide you with a gateway-specific token. Store this securely—you will need it for API requests.
Step 2B: Configure Firewall and Guardrails (Optional)
For production deployments, Cloudflare AI Gateway offers firewall and guardrail features that protect your AI integration from malicious inputs and ensure compliance. While optional for development, these safeguards become essential when exposing AI capabilities to end users.
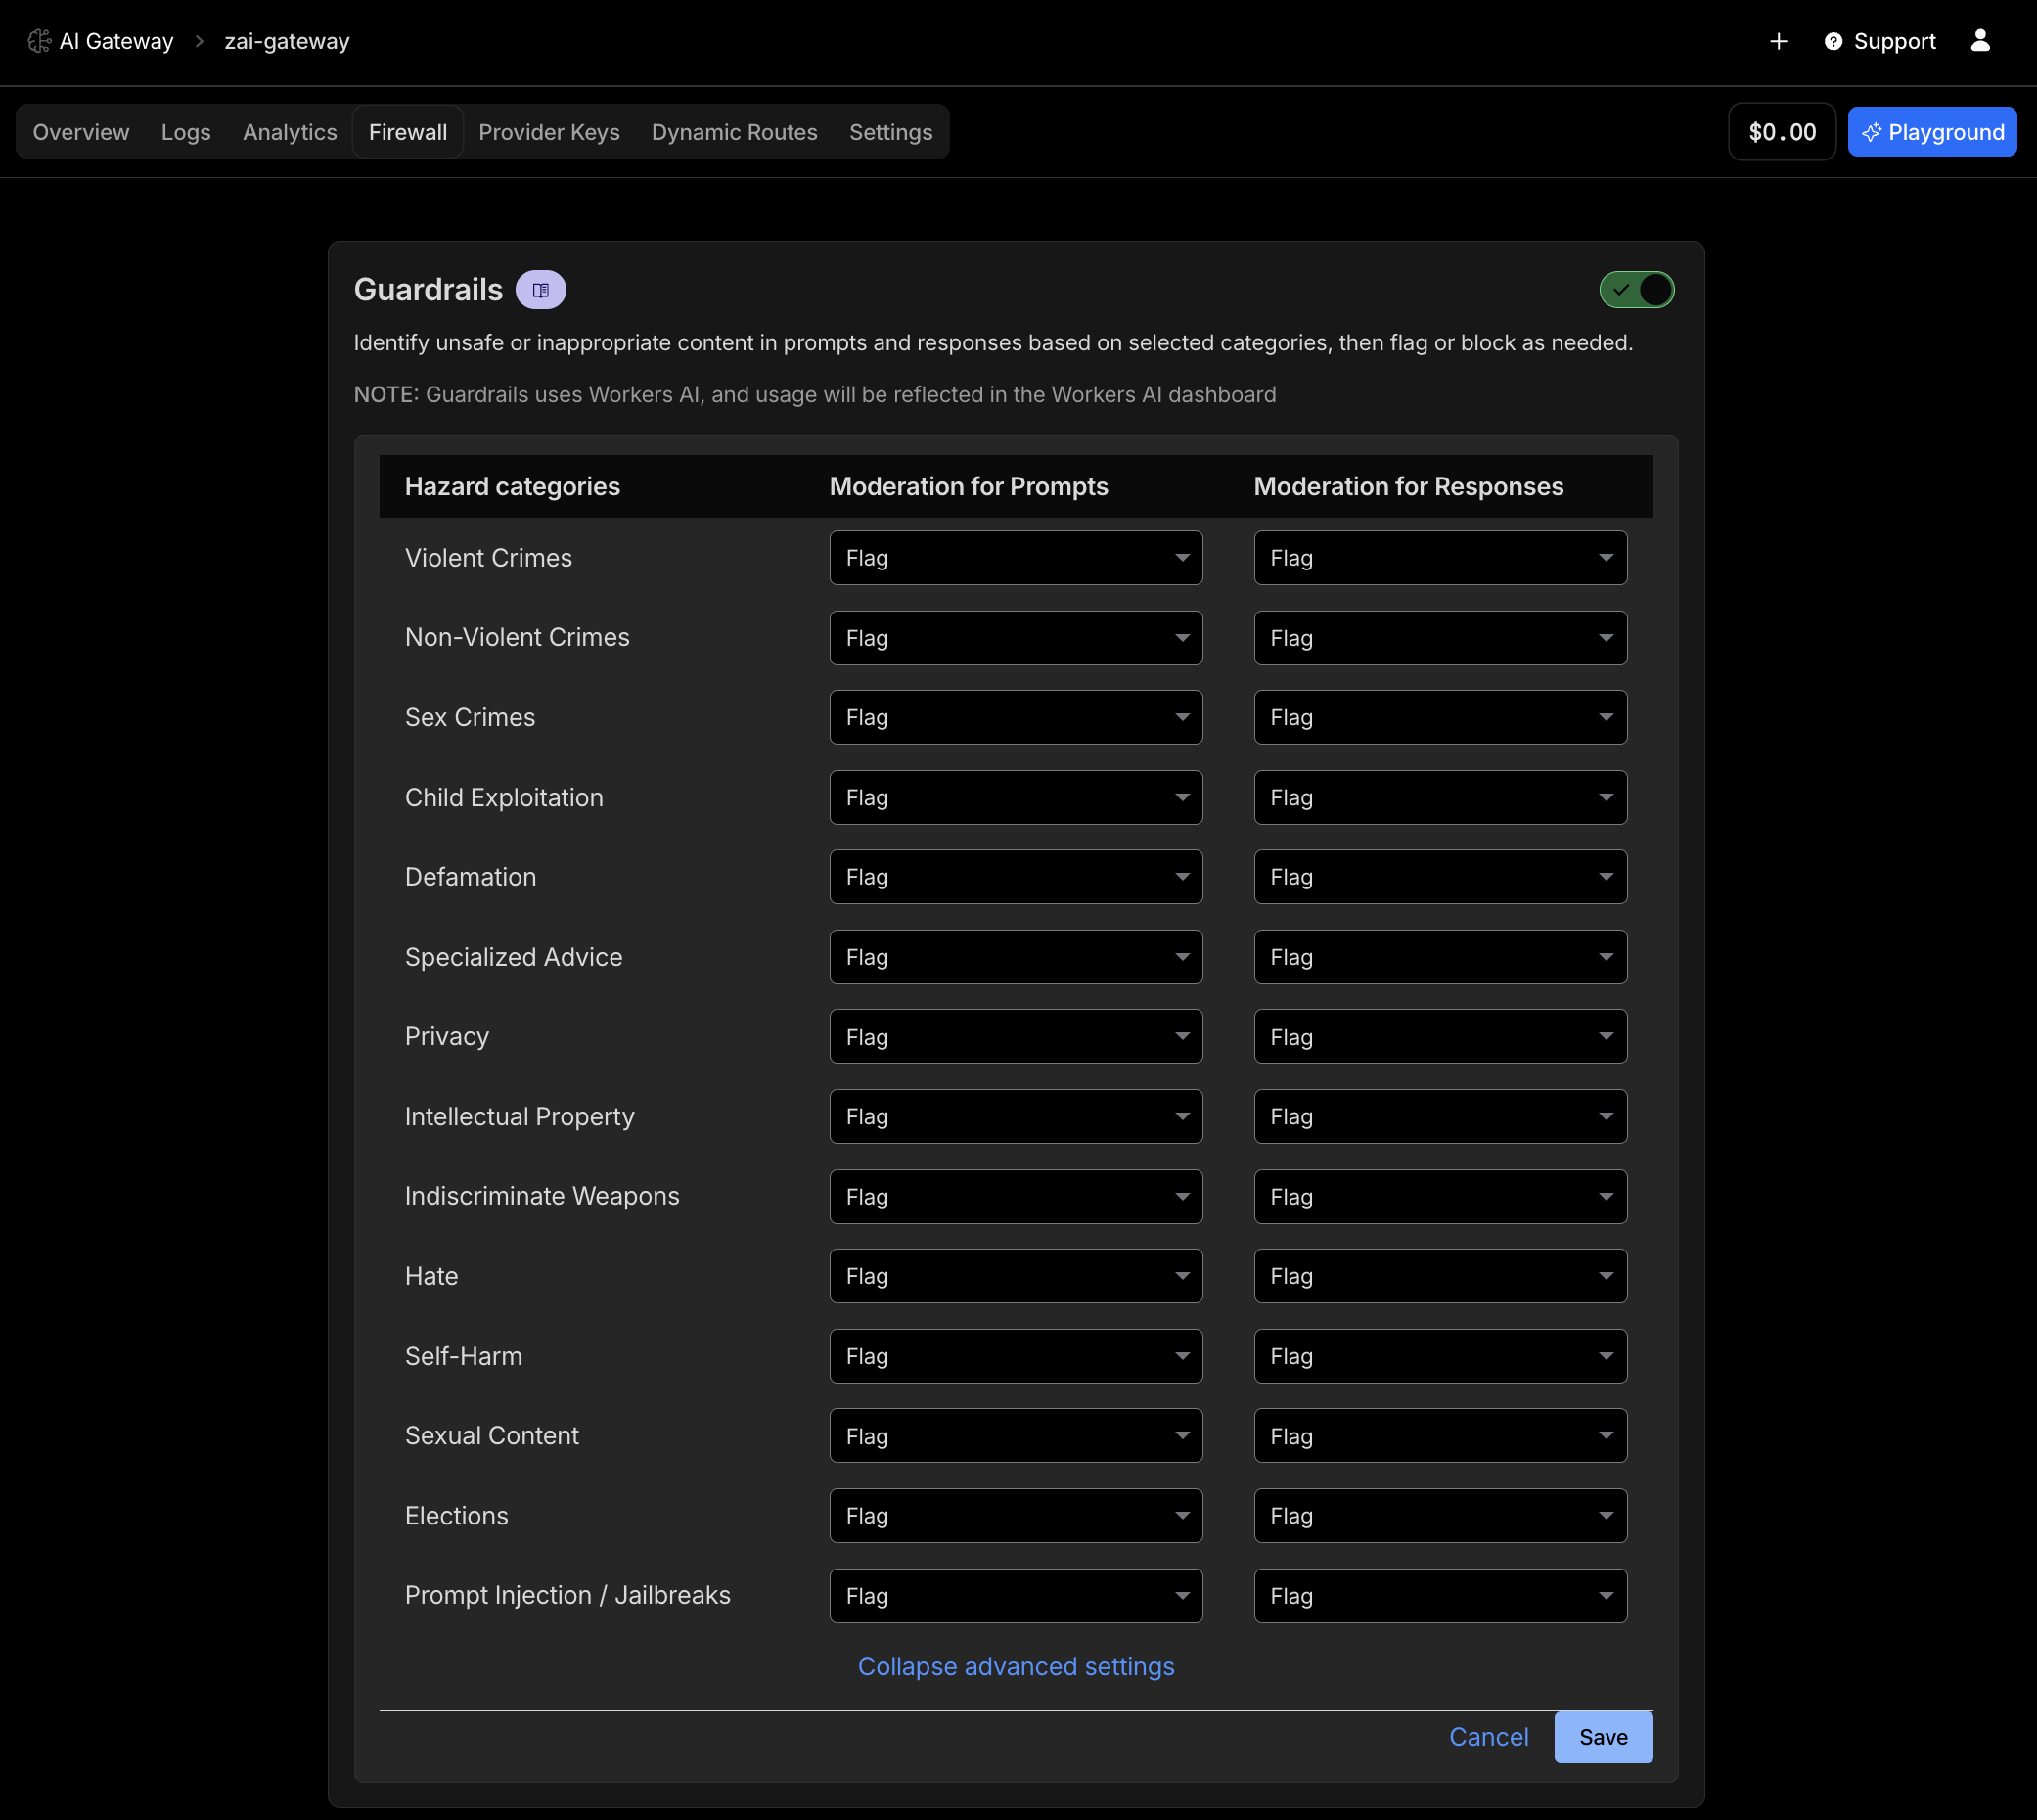
In your gateway settings, navigate to the Firewall or Guardrails tab. Here you can enable several protection layers:
- Prompt injection detection: Filters attempts to manipulate the model through crafted prompts that try to bypass system instructions
- Malicious content filtering: Blocks requests containing harmful, offensive, or inappropriate content before they reach the AI model
- PII (Personally Identifiable Information) detection: Identifies and optionally redacts sensitive information like email addresses, phone numbers, and social security numbers
- Custom content rules: Define your own patterns and keywords to filter based on your application's specific requirements
To enable these features, simply toggle the appropriate switches and configure sensitivity levels. Conservative settings work well for most use cases, but you can adjust based on your specific risk tolerance and compliance requirements.
These protections add minimal latency (typically under 10ms) but significantly reduce security risks. For production applications, especially those facing external users, enabling at least basic prompt injection and PII detection is highly recommended.
Step 3: Configure Z.AI Provider Key
Now link your Z.AI API key to the gateway. Start by generating a new API key from your Z.AI account. Navigate to Z.AI's API key management page, log in, and create a new key. Copy it immediately—Z.AI shows it only once.
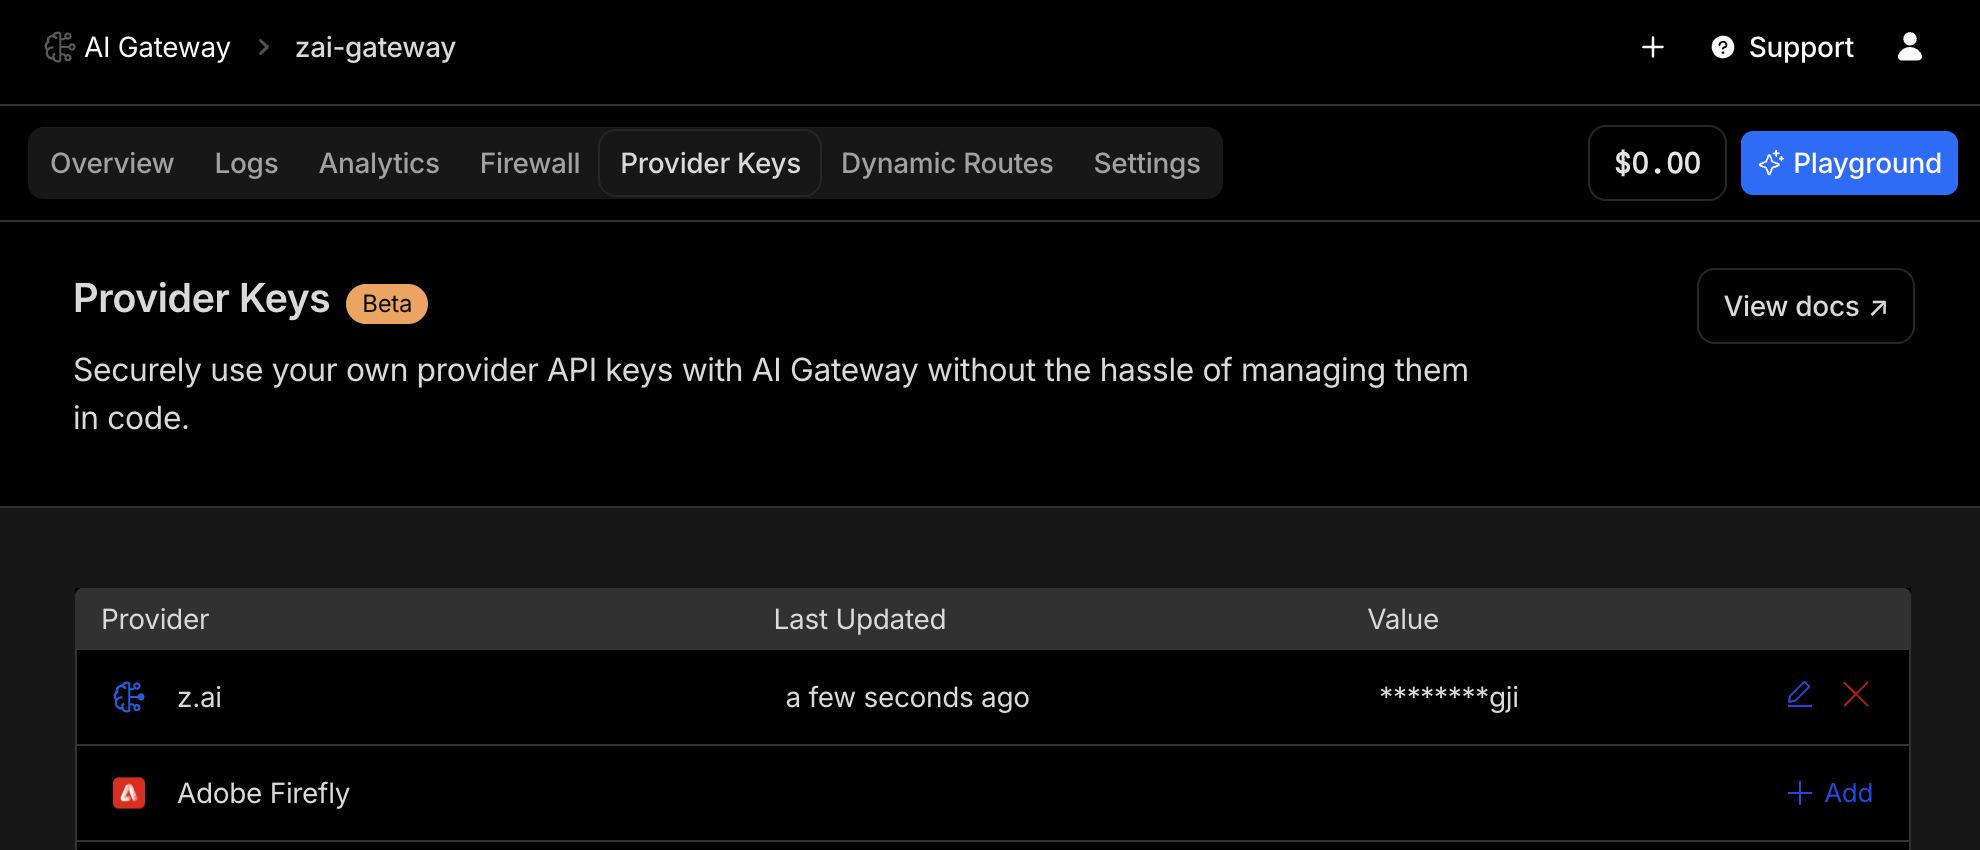
Return to Cloudflare AI Gateway and open your zai-gateway settings. Go to the Provider Keys tab. Select Z.ai from the provider dropdown, paste your API key, and save.
This configuration allows Cloudflare to authenticate with Z.AI on your behalf. Your application only needs the Cloudflare gateway token, not the Z.AI key, which improves security by reducing key exposure.
Step 4: Test the Integration
With everything configured, test the setup using a cURL request. Replace {{ CF ACCOUNT ID }} with your Cloudflare account ID (visible in your dashboard URL) and {{ CF TOKEN }} with the gateway token from Step 2.
curl -X POST "https://gateway.ai.cloudflare.com/v1/{{ CF ACCOUNT ID }}/zai-gateway/custom-zai/v4/chat/completions" \
  -H "Content-Type: application/json" \
  -H "cf-aig-authorization: Bearer {{ CF TOKEN }}" \
  -d '{
    "model": "glm-4.7",
    "temperature": 0.2,
    "messages": [
      {
        "role": "system",
        "content": "You are a professional programming assistant. Output must be valid JSON only, with keys: answer, key_points, example_code, complexity, edge_cases. No markdown."
      },
      {
        "role": "user",
        "content": "Use the following context JSON as authoritative constraints.\nCONTEXT_JSON:\n{\"language\":\"python\",\"audience\":\"intermediate\",\"constraints\":{\"no_external_libs\":true,\"prefer_iterative_when_possible\":false}}"
      },
      {
        "role": "user",
        "content": "Question: Explain recursion and give one Python example. Include time and space complexity. Mention common pitfalls."
      }
    ]
  }'
Understanding the Request Structure
This example demonstrates several important concepts:
- URL structure:
/v1/{account-id}/{gateway-name}/custom-zai/v4/chat/completionsfollows Cloudflare's gateway routing format - Authentication: The
cf-aig-authorizationheader carries your gateway token, not the Z.AI API key - Model parameter:
glm-4.7specifies the Z.AI model you want to use - Temperature:
0.2produces more deterministic, focused responses (adjust between 0 and 1 based on your needs) - System message: Defines the assistant's behavior and output format constraints
- Context injection: The second user message provides structured constraints as JSON, which GLM-4.7 understands well
A successful response returns JSON formatted output matching your system prompt requirements. If caching is enabled and you repeat this exact request, the second call returns instantly from cache.
Understanding the Response
The example request above asks GLM-4.7 to explain recursion in Python with specific constraints: no external libraries, intermediate audience, and structured JSON output. The model processes both the system instructions and the context JSON, then returns a well-structured response that adheres to all requirements. Here is what a successful response looks like:
{
  "choices": [
    {
      "finish_reason": "stop",
      "index": 0,
      "message": {
        "content": {
          "answer": "Recursion is a programming technique where a function calls itself directly or indirectly to solve a problem. It breaks down a complex problem into smaller, more manageable sub-problems that are identical in nature to the original. Every recursive function requires a base case (a condition that stops the recursion) and a recursive step (the part where the function calls itself with modified arguments moving closer to the base case).",
          "key_points": [
            "Base Case: The condition under which the recursion stops, preventing infinite loops.",
            "Recursive Step: The part of the function where the logic splits the problem and calls itself.",
            "Call Stack: Recursion uses the system stack to keep track of return addresses and local variables for each call.",
            "Readability: Recursive solutions can often be more concise and easier to read than iterative ones for problems like tree traversal."
          ],
          "example_code": [
            "def factorial(n):",
            "    \"\"\"Calculates the factorial of n using recursion.\"\"\"",
            "    # Base case: factorial of 0 is 1",
            "    if n == 0:",
            "        return 1",
            "    # Recursive step: n * factorial of (n-1)",
            "    else:",
            "        return n * factorial(n - 1)",
            "",
            "# Usage",
            "print(factorial(5))  # Output: 120"
          ],
          "complexity": {
            "time": "O(n), where n is the input size (e.g., the number 5). The function makes 'n' calls.",
            "space": "O(n) due to the stack depth. Each recursive call adds a layer to the call stack until the base case is reached."
          },
          "edge_cases": [
            "Missing Base Case: If the base case is never reached or defined, the function will call itself indefinitely until Python raises a 'RecursionError: maximum recursion depth exceeded'.",
            "Recursion Depth Limit: Python has a default recursion limit (usually 1000). Recursive solutions on very large inputs may hit this limit, causing a crash.",
            "Inefficient Algorithms: Certain recursive algorithms (like naive Fibonacci) calculate the same values multiple times, leading to exponential time complexity."
          ]
        },
        "reasoning_content": "The user wants an explanation of recursion, a Python example, complexity analysis, and common pitfalls, formatted as valid JSON...",
        "role": "assistant"
      }
    }
  ],
  "created": 1768159759,
  "id": "2026011203290749af478b944d4471",
  "model": "glm-4.7",
  "object": "chat.completion",
  "request_id": "2026011203290749af478b944d4471",
  "usage": {
    "completion_tokens": 999,
    "prompt_tokens": 100,
    "prompt_tokens_details": {
      "cached_tokens": 3
    },
    "total_tokens": 1099
  }
}
Notice how GLM-4.7 not only understood the structured request but also returned perfectly formatted JSON with all requested keys: answer, key_points, example_code, complexity, and edge_cases. The model even included a reasoning_content field explaining its thought process, which is valuable for understanding how it interpreted your constraints.
This structured approach is incredibly powerful for production applications. You can use it to build:
- Code documentation generators: Pass function signatures and get structured explanations with examples, complexity analysis, and edge cases
- Interactive coding tutors: Provide student code and constraints, receive structured feedback with key points and improvements
- API response validators: Define your output schema in the system prompt and get guaranteed JSON structure
- Knowledge extraction pipelines: Process technical content and extract specific fields into database-ready formats
The usage object at the bottom is particularly useful for monitoring costs. In this example, the request used 100 prompt tokens and generated 999 completion tokens (1099 total). With Cloudflare's caching enabled, identical requests cost nothing, making this approach extremely efficient for applications with repeated queries or common patterns.
Benefits of This Integration
After using this setup for several days, the advantages are clear:
Caching Reduces Costs
Identical requests hit cache instead of Z.AI's API. For development workflows where you test the same prompts repeatedly, this cuts costs significantly. In production, caching stable prompts (like system messages) improves response times and reduces load on both your infrastructure and Z.AI's.
Rate Limiting Prevents Quota Exhaustion
Rate limiting acts as a safety net. If a bug causes your application to loop API calls, the gateway enforces limits before you drain your quota. This is particularly valuable during testing and debugging.
Authentication Adds Security
Gateway tokens are scoped to specific gateways. If a token leaks, an attacker can only access that gateway, not your entire Cloudflare account or Z.AI Coding Plan. You can revoke and rotate tokens without touching your Z.AI API keys.
Analytics Provide Visibility
Cloudflare's AI Gateway includes a comprehensive analytics dashboard that tracks every aspect of your AI API usage. This is not just logging—it is actionable intelligence about how your application uses AI models.
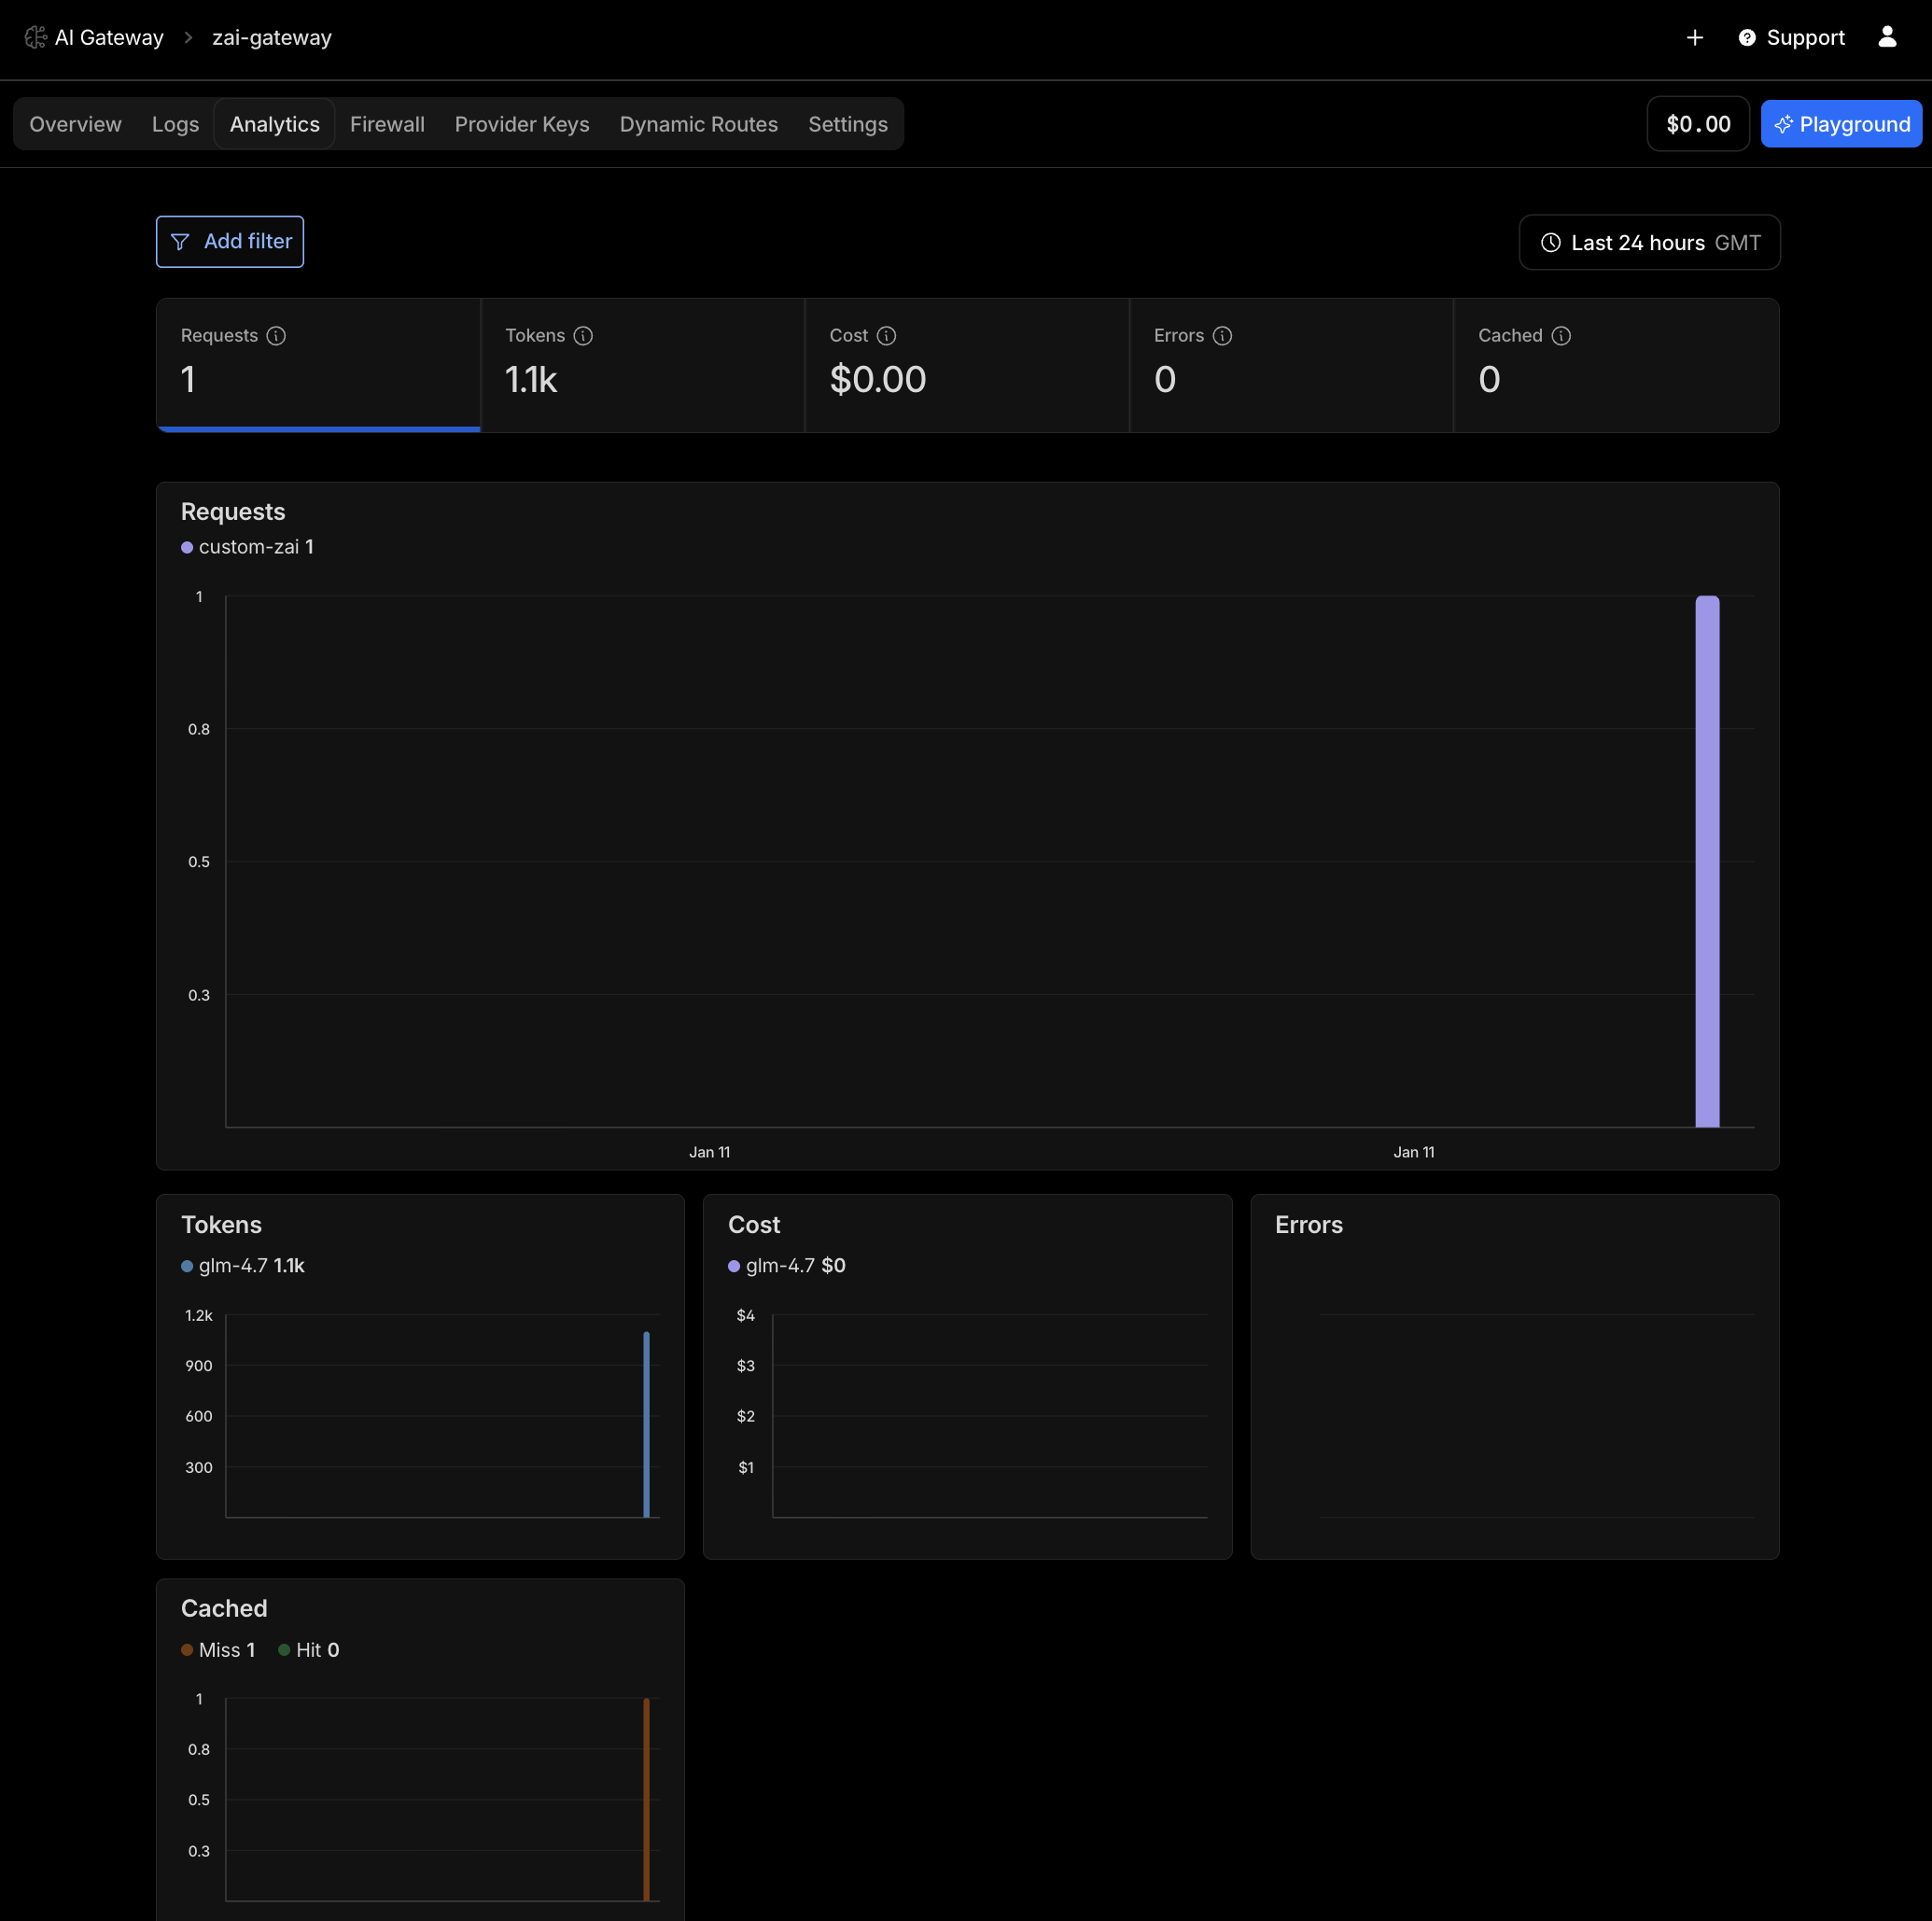
The analytics dashboard tracks key metrics that directly impact both performance and cost:
- Request volume over time: Visualize usage patterns and identify peak traffic periods
- Cache hit rates: See how many requests are served from cache versus hitting the API, directly correlating to cost savings
- Average response times: Monitor latency and identify performance degradation
- Token usage: Track consumption to predict costs and optimize prompts
- Success and error rates: Quickly spot integration issues or API problems
To access these analytics, navigate to your gateway in the Cloudflare dashboard and select the Analytics tab. You can filter by time range, drill down into specific requests, and export data for deeper analysis. This visibility helps you optimize prompt engineering, right-size your caching strategy, and catch issues before they impact users.
Centralized Management
If you use multiple AI providers, managing them through Cloudflare AI Gateway simplifies configuration. Instead of juggling different API keys and rate limits across services, you configure everything in one place.
Real-World Use Cases
This integration is not just theoretical. Here is how I use it:
- Programming assistants: GLM-4.7 excels at code generation. Routing requests through Cloudflare caches common boilerplate generation tasks.
- Documentation generation: For generating API docs from code comments, caching identical inputs prevents redundant processing.
- CI/CD integration: Automated code review workflows benefit from rate limiting to avoid overwhelming the API during batch processing.
- Prototyping: During development, I test prompts repeatedly. Cloudflare's cache makes iteration faster and cheaper.
Troubleshooting Common Issues
If you encounter problems, these solutions cover the most common issues:
Authentication Failures
If you receive 401 Unauthorized errors, verify:
- Your Z.AI API key is correctly pasted in the Provider Keys tab
- The
cf-aig-authorizationheader includesBearerfollowed by a space and your gateway token - Your Z.AI Coding Plan tier includes API access (some free tiers do not)
Gateway Timeout Issues
If requests timeout, check:
- The provider URL is exactly
https://api.z.ai/api/coding/paas/with no trailing slash variations - Z.AI's service status (check their status page or community forums)
- Your network allows outbound HTTPS connections to Cloudflare and Z.AI
Rate Limiting Messages
If you hit rate limits unexpectedly:
- Review your gateway's rate limit settings in Cloudflare
- Check if multiple applications share the same gateway
- Consider creating separate gateways for different environments (dev, staging, production)
Invalid Model Name Errors
If you receive model-not-found errors:
- Verify you are using
glm-4.7exactly as written (case-sensitive) - Confirm your Z.AI Coding Plan includes access to GLM-4.7
- Check Z.AI's documentation for any model name changes or deprecations
Using Gateway Logs for Debugging
One of the most valuable troubleshooting tools Cloudflare AI Gateway provides is detailed request logging. When something goes wrong, logs tell you exactly what happened at each step of the request lifecycle.
To access logs, navigate to your gateway in the Cloudflare dashboard and select the Logs tab. Here you will see a chronological list of all requests, including both successful and failed attempts.
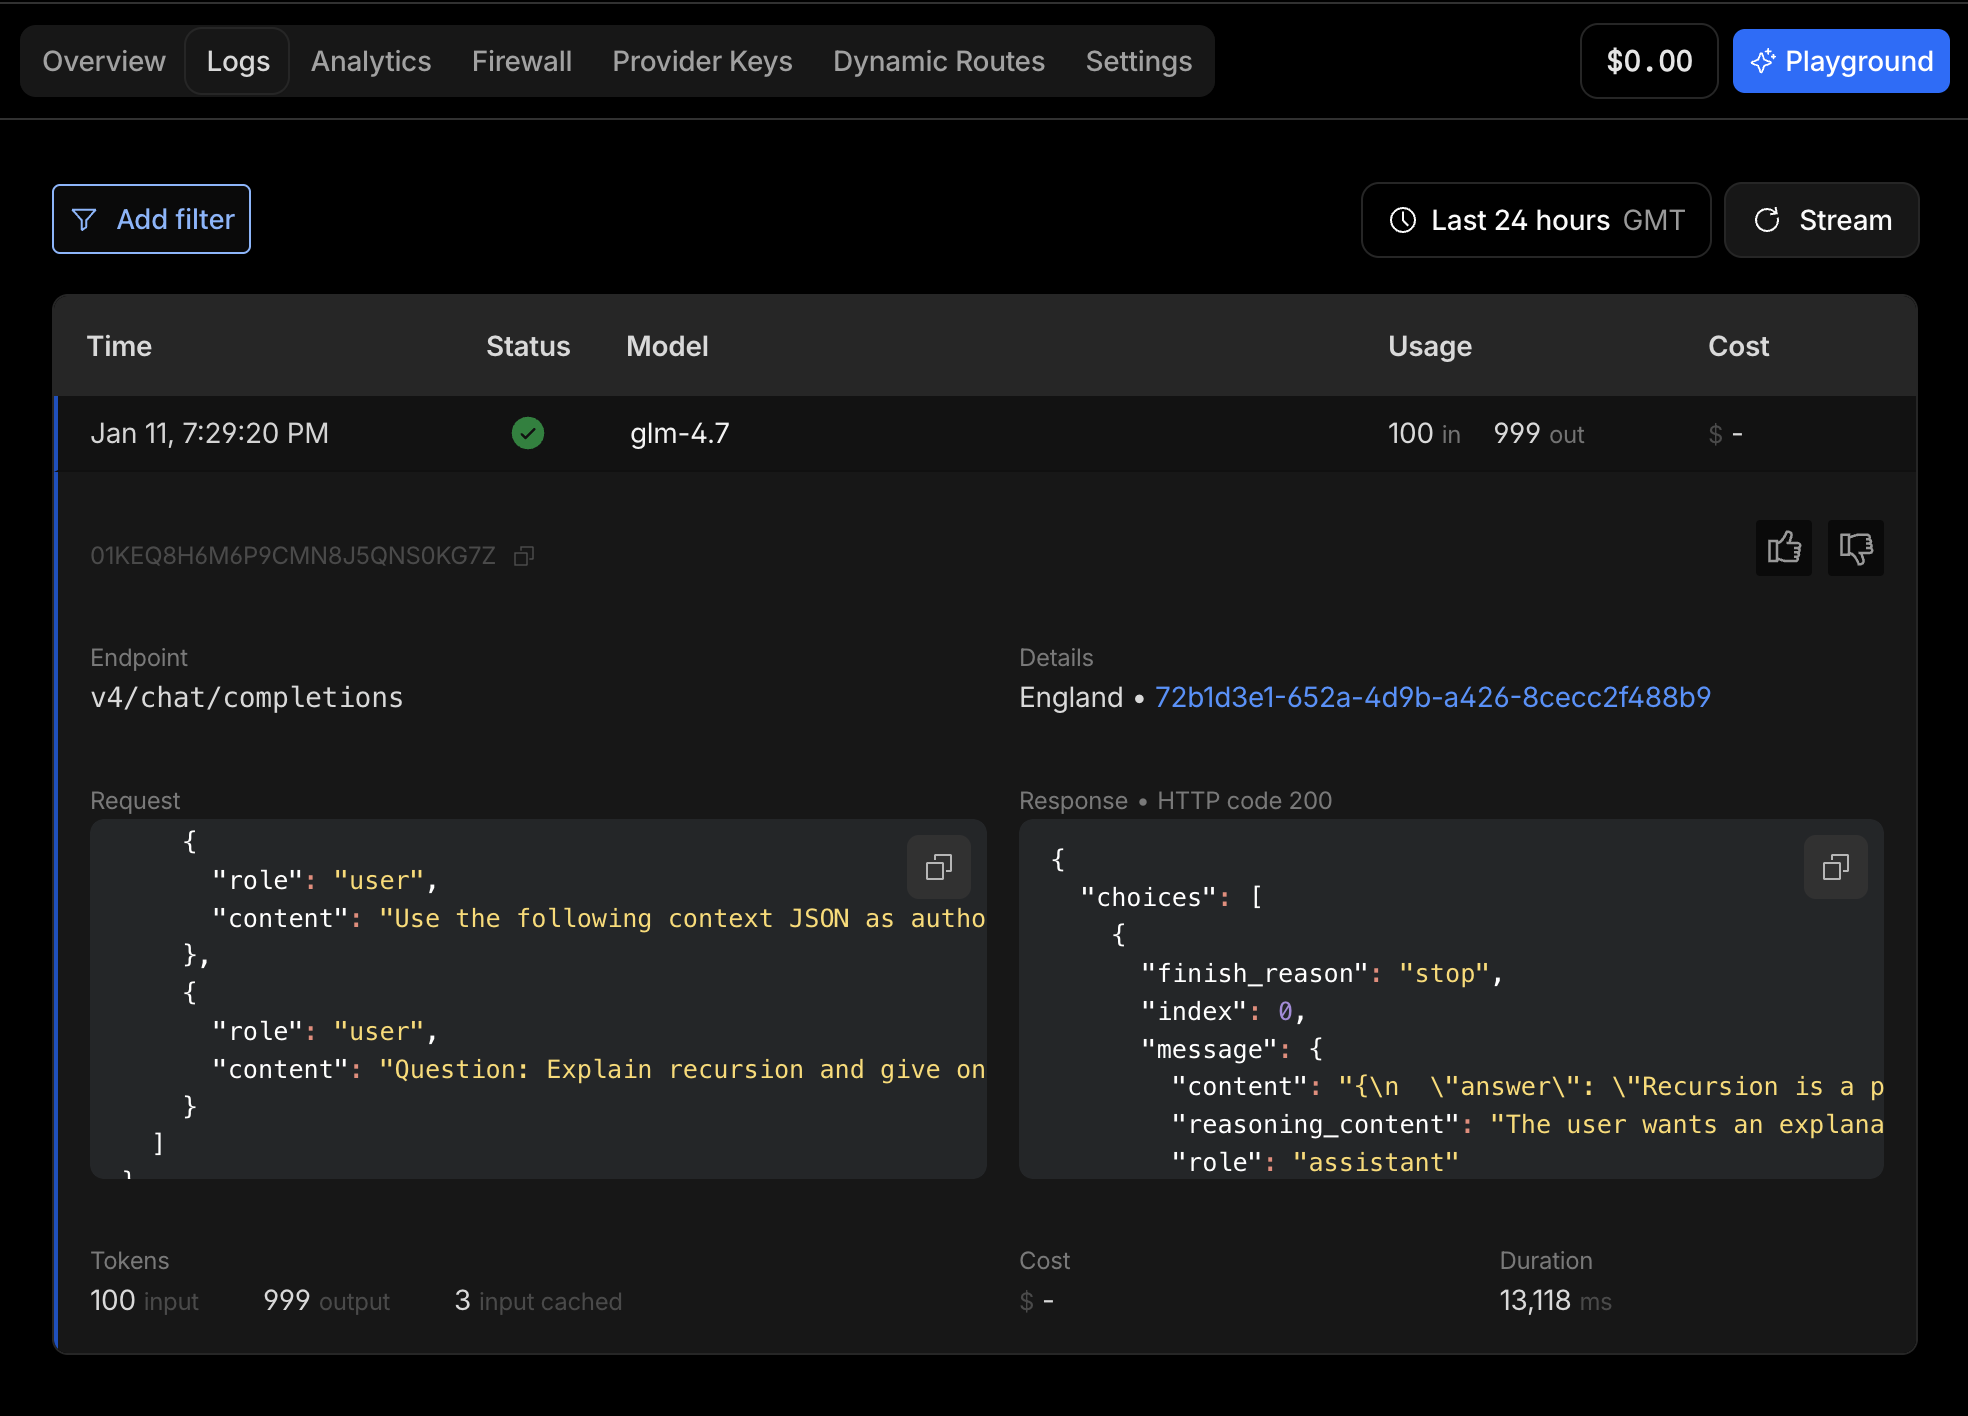
Each log entry contains critical debugging information:
- Request and response headers: See exactly what was sent to and received from the API
- Status codes: Quickly identify HTTP errors (401 for auth, 429 for rate limits, 500 for server errors)
- Timestamps: Correlate issues with specific time periods or traffic patterns
- Error messages: Read detailed error descriptions from both Cloudflare and Z.AI
- Cache status: Verify whether requests hit cache or went through to the API
When troubleshooting, start by filtering logs for error status codes (4xx and 5xx). Click any log entry to expand full details, including the complete request payload and response. This level of visibility dramatically reduces debugging time compared to blind API calls.
Debugging Tips
When debugging:
- Use
curl -vto see full request and response headers - Check Cloudflare's AI Gateway logs (available in the dashboard) for detailed error messages
- Test your Z.AI API key directly against
api.z.aito isolate whether the issue is with Z.AI or Cloudflare - Verify your Cloudflare account ID is correct (it appears in dashboard URLs as
dash.cloudflare.com/{account-id}/)
References and Further Reading
For additional details and official documentation:
- Cloudflare AI Gateway Documentation - Official guide covering all gateway features
- Z.AI API Documentation - Complete API reference for Z.AI services
- GLM-4.7 Model Documentation - Technical details and capabilities of the GLM-4.7 model
- OpenAI API Structure - Reference for understanding the compatible API format
- Z.AI Coding Plans - Pricing and features (includes referral discount)
Conclusion
Integrating Z.AI's GLM-4.7 model with Cloudflare AI Gateway transformed how I manage AI API requests. The caching alone saves money and improves response times. Rate limiting prevents quota accidents during development. And the centralized analytics give me visibility into usage patterns I never had before.
If you are building AI-powered applications or using GLM-4.7 for coding assistance, this integration is worth the 15 minutes it takes to configure. The operational benefits compound quickly, especially as your usage scales.
As a Z.AI ambassador, I have seen firsthand how their models handle complex programming tasks. Pairing that capability with Cloudflare's infrastructure creates a workflow that is both powerful and reliable.
Ready to get started? Sign up for Z.AI's Coding Plan and configure your Cloudflare AI Gateway today. The entire setup takes about 15 minutes, and you will immediately start seeing the benefits of caching, rate limiting, and centralized analytics. As a bonus, using my referral link gets you 10-20% off your Coding Plan.
Give it a try, experiment with the settings, and see how it transforms your AI workflow.